What is White Balance?
Ever wondered why your subjects turn out yellow when photographing them in indoor environments? Or why your camera flash can make them appear blue? Thoroughly understanding the concept of white balance and how it works is very important in digital photography, because setting it incorrectly could ruin a picture, adding all kinds of unwanted color casts and causing skin tones to look very unnatural. In this article, I will explain how you can adjust it on your camera or post-production to get accurate colors.
1) Definition of White Balance
Simply put, white balance in digital photography means adjusting colors so that the image looks more natural. We go through the process of adjusting colors to primarily get rid of color casts, in order to match the picture with what we saw when we took it. Why do we have to do this? Because most light sources (the sun, light bulbs, flashlights, etc) do not emit purely white color and have a certain “color temperature“. The human brain processes the information that comes from our eyes and automatically adjusts the color temperature, so we normally see the colors correctly. If you took a white sheet of paper and looked at it outside, it would most likely look as white as if you were to look at it indoors. What most people do not realize, however, is that there is a huge difference in color temperature between bright sunlight and indoors tungsten light.
If you are a skier or a snowboarder, try this quick experiment: put on your ski goggles and look at the snow – it should change in color tone. If you have ski goggles with a yellow tint, the snow will look yellowish. However, after you ski for a little bit, your eyes and your brain will adjust for the color and the snow should look white again. When you take off your ski goggles after skiing, the snow will look bluish in color rather than pure white for a little bit, until your brain adjusts the colors back to normal again. This example proves the fact that we are equipped with a very sophisticated color system that automatically adjusts colors in different lighting situations.
While our brains automatically process the colors for us in such a smart way, digital cameras can only guess what the color temperature is by watching the ambient light. In most cases, modern digital cameras can guess pretty well, however, in some situations they make errors. Because of these errors, some of the pictures might appear to be bluish or yellowish in color and the skin tones might not look natural.
Here is an example of both correct and incorrect White Balance:


As you can see, the image of Omar on the left feels more natural and the skin tones look correct, while the image on the right is too yellow. The second image clearly needs its white balance adjusted to eliminate the yellow tones.
2) Color Temperature and its Measurement
As I have said above, different light sources have different color temperatures. These color temperatures are measured in Kelvin and you will most often see something like “5,500K” which is typical daylight. Take a look at the following sample chart that shows approximate Kelvin colors and values:
| Light Type | Color Temperature in Kelvin (K) |
| Candle Flame | 1,000 to 2,000 |
| Household Lighting | 2,500 to 3,500 |
| Sunrise and Sunset |
3,000 to 4,000
|
| Sunlight and Flash |
5,000 to 6,000
|
| Noon Sun and Clear Sky |
6,000 to 6,500
|
| Cloudy Sky and Shades |
6,500 to 8,000
|
| Heavily Overcast Sky |
9,000 to 10,000
|
If your camera is set to “Auto White Balance”, it will try to guess the Kelvin value based on a white object that serves as a reference point. For example, white clouds in a scene would be used as a white reference point and the rest of the colors would be based on this reference color. This type of calculation is not always going to yield good results, especially if the scene you are photographing does not contain pure white colors or is dominated by just one color. Therefore, in such cases you might need to manually set the correct White Balance on your camera or during post-processing.
3) Should you change WB in camera or during post-processing?
One of the great things about digital photography, is that we no longer really have to use white cards and cast-removing filters in order to get accurate colors. If you shoot in RAW format, the RAW image can be converted to any white balance, because this information is only saved as a reference and the original image stays untouched and unprocessed by the camera. This means that as long as you shoot in RAW, you can simply ignore the settings and shoot in any WB mode. I personally set my camera to “Auto White Balance” at all times and I let the camera guess what the correct colors should be. If my camera is unable to guess the correct white balance, I simply change it in Lightroom and I can copy-paste the new setting to as many pictures as I need. So if you have your camera set to shoot RAW, simply set it to Auto White Balance and you are good to go. This is one of the advantages of shooting RAW and you can read about other advantages of the RAW format in my RAW vs JPEG article.
But what if you do not use RAW and shoot JPEGs? Then you will need to learn how to use white cards and how to adjust white balance on your camera. Again, in most circumstances your camera will do a pretty good guessing of color temperatures, but there will be cases where the camera will be fooled by lighting conditions and give you bad colors. That’s when you need to manually change it on your camera.
4) How to Change White Balance in Camera
The process of changing white balance in a digital camera varies from manufacturer to manufacturer and model to model. For example, most Nikon professional cameras such as Nikon D300s/D700/D3s have a dedicated “WB” button on the top dial, while cameras such as Nikon D90 have a “WB” button on the back of the camera close to the LCD screen. So, in order to change it, all I need to do is hold the WB button with one hand, then rotate the rear dial counter-clockwise. All current Nikon DSLRs also allow you to change white balance through a menu setting. If for whatever reason you cannot locate the setting in your camera, I highly recommend reading the owner’s manual – it should clearly state where you can change it from.
5) White Balance Presets
Most current DSLR and point and shoot cameras have white balance presets that are set to a certain Kelvin number by the manufacturer. These presets also vary depending on the manufacturer and camera model. Here is the list of presets for most Nikon DSLR cameras:
- Auto (A) – Default WB setting and what I use all the time when I shoot RAW. The camera automatically guesses the WB depending on ambient light and use of flash.
- Tungsten (Light Bulb) – Use it strictly under tungsten light bulbs or the image will look very blue.
- Fluorescent (Glowing Tube) – Use if photos look too green or when under fluorescent lights.
- Direct Sunlight (Sun) – Used when shooting outdoors with the sun shining on the subject.
- Flash (Lightning Bolt) – Used when using on-camera flash.
- Cloudy (Cloud) – Used in cloudy days or in shades. Will yield warmer images than sunlight.
- Shade (House with a Shadow) – Warmer than cloudy, adding orange colors to the photograph. Good for sunsets and shades.
- Continuously Variable (K) – Lets you manually change the Kelvin value from 2,500 to 10,000.
- Preset (PRE) – Used for color matching with a white card.
Again, the above list might be different for your camera and I’m providing the information only as a reference.
The best way to obtain the correct white balance is through the “Preset (PRE)” setting. Simply hold a white card in front of the camera lens and press the shutter button. The camera will then read the correct color temperature of the light that gets reflected from the white card and will use it instead.
6) How to Change White Balance in Lightroom
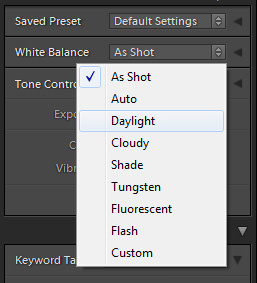
It is very easy to change white balance presets in Lightroom. While in “Library” module, simply look at the right panel and pick a preset from the “White Balance” drop-down under “Quick Develop” menu setting as shown below:

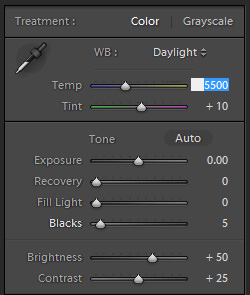
You can also adjust the color temperature and tint in Lightroom. Simply switch to “Develop” module and look under the “Basic” menu. You can either type in the color temperature/tint or you can move it with a mouse:

7) Creative Uses
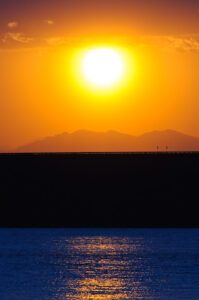
The coolest thing about white balance, is that you can use it creatively to obtain a completely different look of the image. Take a look at the below images:


The image on the left is how it came out of my camera and the image on the right is how it looks after I changed WB to “Tungsten” in Lightroom. The image on the left looks dull, while the image on the right looks very colorful. I like the blue color in water and the fact that the mountains are now much more visible and darker, which gives the image a whole different look.
If you have enjoyed this article, please check out our in-depth Level 1 Photography Basics Course, where we explore all the basics of photography in much more detail. It is an intensive, 5+ hour course with enough material to not only get you started today, but also to serve as a reference material in the future.
What is White Balance?
![What is White Balance?]() Reviewed by Ariful Haque
on
7:46 AM
Rating:
Reviewed by Ariful Haque
on
7:46 AM
Rating:
No comments: